give the gift of memories-instax flip album

with the season of giving quickly approaching, if you are anything like me you are always looking for the "perfect gift".  now, for me the perfect gift does not equal having to spend a lot of money.  the perfect gift in my opinion signifies something that has that personal touch.  something unique and special and full of love.  and if it includes photos...a definite bonus!


if any of you have been to michaels stores recently, you probably have come across heidi swapp's brand new collection and collaboration with fuji film instax!  yes...those super cute little old school polaroids with the funky cameras?  yes, that's the one!  and i know, could it really get any more awesome?  a collab with two incredible brands.  genius!  what is so fun with this collaboration is that it is not just the amazing cameras and film that one can enjoy...there is now an array of products to work with all of your cute instax prints.  there is albums, stickers, accessories...SO much fun! and yes...those gifts we were talking about earlier?  they make the most PERFECT gifts.  let me show you!


this time of year is perfect for giving photo gifts because i know everyone has those fabulous family fall photos hanging around!  whether they are taken professionally, or just in passing...it really does not matter.  the most important thing is that you have the photos...and now the fun part! displaying them!  i wanted to create a gift for my husbands desk and what better way than that than to include some of our fall photos that we had taken back a few weeks ago and use the gorgeous black and white heidi swapp instax desktop flip album.  

the album is sold as a kit and in the kit you get some fabulous exclusives such as...

these adorable gold transparency stickers...perfect for whatever you choose to document in this brilliant album!


gorgeous camera photo clips.  they are TOO cute.  pictured here are only 3...there are more in the kit but unfortunately those others already have found another home in a project of mine! i could not resist! ;)


and then there is the adorable flip album simply ready to be filled with your photos and memories.


inside my album i have included photos that i have taken both with my instax mini 8 camera, as well as photos i have printed with my instax share printer.  two great ways and options to capture your memories with instax!


to create my album, i also included some of the other gorgeous instax products that are now available at michaels.  these products include stickers and washi...some come from other instax kits (that are amazing) and others can be bought as is.  they are so fun to use and i love how they all work together with the products to achieve beautiful results on ones projects.


i kept this project "photo focused" so that you can really see that it is so simple to create a unique photo gift for someone you care about that does not take a ton of time to do.  you can keep it simple, or embellish to your hearts content.  the option is yours.  regardless it ends up being a project filled with beautiful memories that i just know any recipient will treasure and love.

now let's take a look inside!


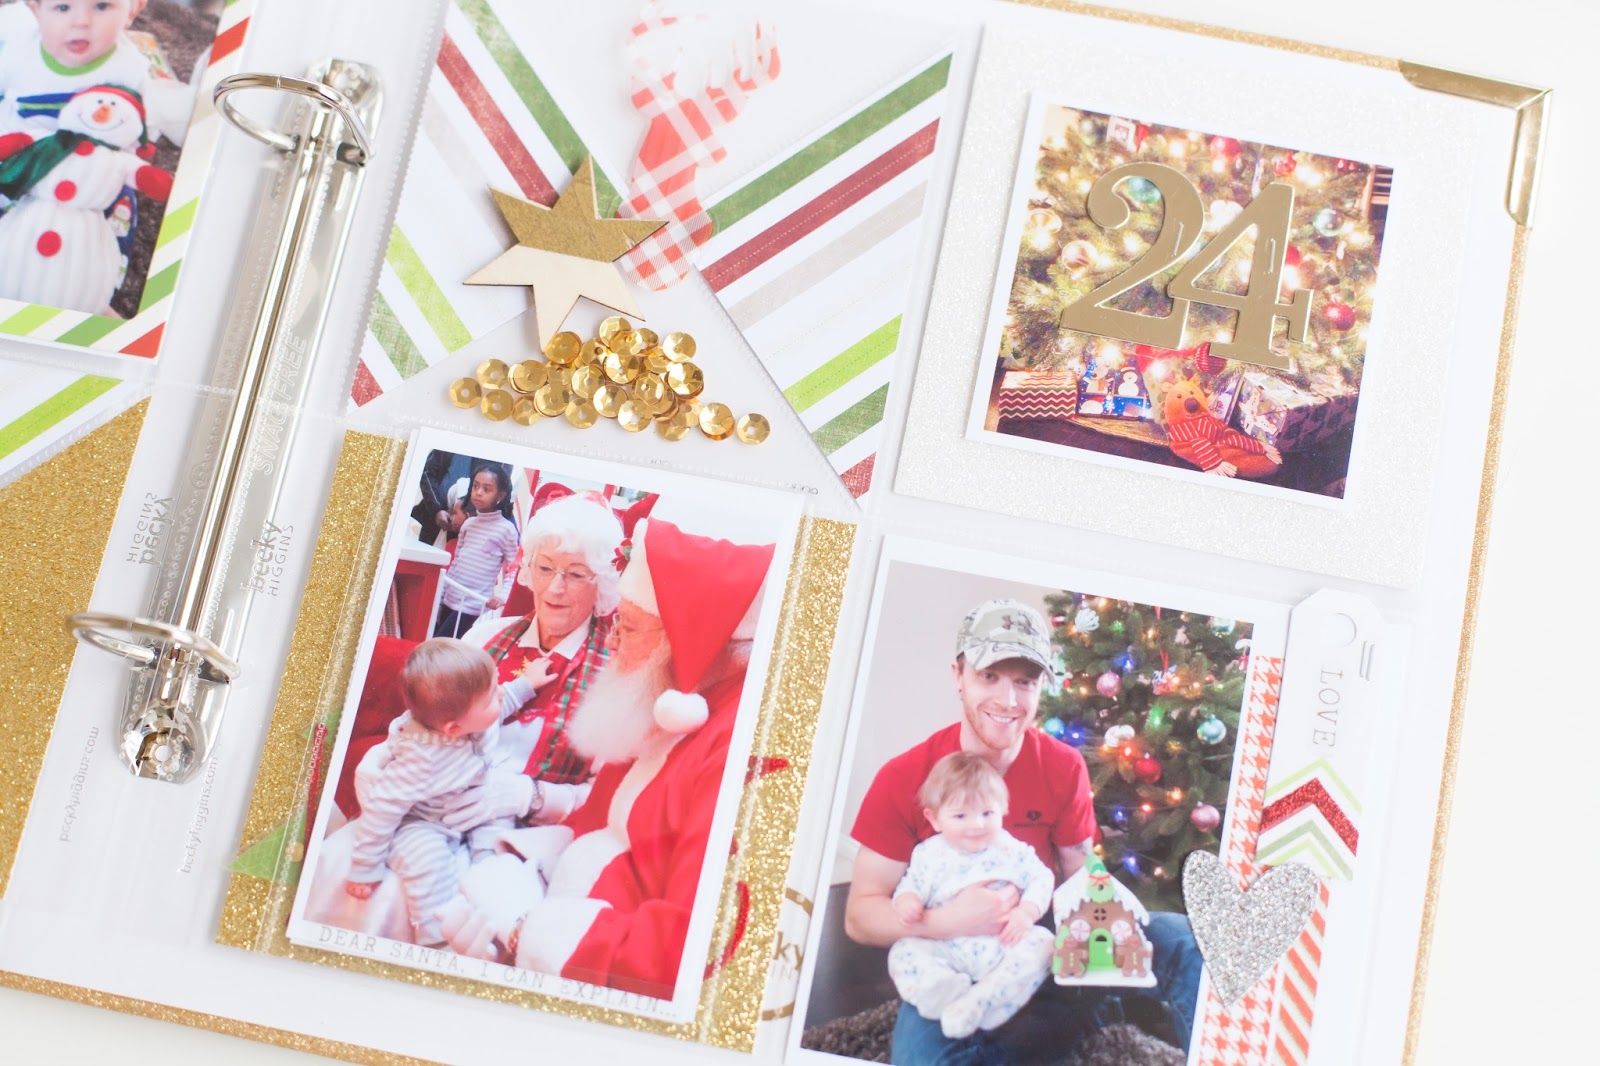
i added some fun details to this first page.  a glitter instax frame, some gold foil stickers and some type text stickers.


the stickers are transparent so they don't even look like a sticker.  they have a gorgeous metallic shine and almost look as if they are part of the photo!


for this page i added a gold word sticker 'awesome' and some gold patterned stickers that i attached like washi to each corner of the photos.


i love the gold detailing of this handwritten sticker.  they are perfect for titles and captions.


i added the 'favourite' gold sticker to this set of photos...this is the metallic sticker that comes from one of the other instax kits.  i love how even though this sticker set is not part of this kit in particular you can mix and match and everything works so well together.


one of my favourite things to do with my instax prints is to have fun with the "white space" of the instax.  it is a great space to embellish with stickers, rub ons...stamps and even journaling!  on this page i included one of the instax sticker photo overlays and then i had fun layering some of my favorite stickers to the other photo.  such a fun and easy technique.


i am so excited to finish compiling this album and gift wrap it for my husband.  we appreciate time more than ever now with our little guy and photos are just a piece of our journey that we will never get back as he is growing so fast.  this way, my husband can have a flip through of a precious memory we shared...something that money can never buy.  photos are truly treasures.  memories are priceless gifts.  so thankful for heidi swapp and instax in creating such gorgeous products that make gift giving with memories so easy and beautiful.  hope you can find yourself an instax flip album kit and create one of your own to surprise someone with.  i can guarantee you they will love it! 
1

oh what fun! pocket pages and the fuse...

well....can i just say how excited i am for the holidays this year?  i do not know what it is...but i cannot wait to begin documenting the holiday season for 2015.  maybe it has to do with the fact that my little guy will be just that more older than last year to enjoy the season. or that there are SO many amazing holiday goodies coming from heidi swapp that i cannot stand the excitement? ahhh...definitely a combo deal i am thinking for sure!


i have been playing with some of the gorgeous elements and products from her "oh what fun" collection.  eeeeeeek! there are SO MANY amazing components to this line.  today i am sharing how i have used some of my recent favourites from the collection in my pocket pages.  i have also used the amazing we r memory keepers becky higgins project life fuse tool to help me along the way.  so...let's get started!

these transparent shapes are brilliant!  they come as an assortment, in different colors and shapes and work amazingly with the fuse.  i love that they are transparent because you can layer them, they will look amazing on either side of a pocket page and you can add them both inside pockets or on the outside!  i have included both ways in my pocket page and i am excited to share with you!


as always...gorgeous ephemera. and LOTS of it.  these pieces are so fun to layer, slip in pockets, add onto photos...the list goes on and on.


so here is my first official holiday pocket page spread using the incredible "oh what fun" collection!
i even chose to use the 8x8 pocket pages to create this double page spread and i LOVE it. to be honest i think i am sort of obsessed with this size lately! ;)


as always...i love to add things to both the insides and outsides of my pockets.  i love flaps, dimension, glitter and stickers.  of course this is all possible with that beauty of a tool called 'the fuse'.


so let's talk left hand side spread:
i really mixed it up here.
i added in my photo, but actually kept my photo 3x4 size.  i wanted to showcase that just because these pockets are "4x4" doesn't mean you have to use 4x4 photos!  you can use whatever size you may have and just have fun with them.
here i added a chipboard frame around my photo and tucked it in the pocket, securing the open side with the fuse.
i also added in pattern paper, layered with stickers, tags and embellishments.
i also used the fuse to secure two different papers that i trimmed into triangles.


i added in a fun flap.  i used the 3x4 photo pockets from becky higgins and trimmed it down to fit in this cute tag.  i secured the open end with my fuse and then attached to my page with the fuse again.


i had a bit of open space in my 4x4 pocket so i slipped in this sweet little tag.  one is never to stress if things do not align perfectly and there are open spaces within ones pockets.  there are so many wonderful embellishments in the "oh what fun" collection that there will always be something sweet to tuck inside!


here is another fun way i used my fuse.  now...these transparent shapes can be used in all sorts of ways.  for this pocket, i inserted the star inside.  to avoid it slipping around and falling out of the pocket i used my fuse tool to secure it inside.  i fused along each edge so now it cannot move and looks like it kind of "floats".
i love this technique.  i then added in the gold glitter sequin to either side of the star and then fused the top.


now onto the right hand spread:
i used the fuse to create some fun geometric shapes within a pocket.


i then added some layers with stickers and wood veneer.


here is my other interactive piece to this layout.
i created another flap.


however, underneath i placed two transparent shaped trees underneath and fused them to my pocket page...but this time OUTSIDE of the page protector!  i know SO AWESOME!  i LOVE how you can fuse these pieces any which way.  i layered these two on top of each other and i love how the combo works together beautifully.  plus, you can touch them and the ends flip up a tad so it adds a bit of texture to the page.


you can see how easy it is to use the fuse....simply place where desired and run your tool along wherever you would like your shapes secured.
i then could not resist adding on the 'believe' red glitter sticker in heidi's handwriting....because well...it is just too gorgeous not to!


this collection is SO much fun to play with! especially when the FUSE tool is involved...and pockets!
i hope you are inspired to include the fuse tool into your pocket pages this december...it is a fabulous way to add in little details and customization within your pockets.


happy creating everyone.  how many more days till christmas?!? (wink!)

0

prismatic, project life & the fuse!

today i am sharing one of my most favourite layouts yet!  yes...i may say that each and every time, but i think this one...yes is my most loved yet!  it includes all of my top must have scrapbook products and literally rolls them all into one project!

for starters...it includes the becky higgins project life fuse tool.  i just ADORE this little tool.  creating my own custom pocket pages has become my latest obsession.  i love incorporating so many elements into my pocket pages and this wonderful tool allows me to do just that!


my entire page today was created using this amazing tool.  i love it!


i also used gorgeous cards from the heidi swapp prismatic project life kit to create my page.  the bright colours, foil touches and amazing designs really helped pull it all together.  i then could not resist including some of the gorgeous sticker sets (and other fun extras!) that are now available at michaels.  they helped embellish my page perfectly and are so much fun to use!


and here is my full 12x12 pocket page.  so fun right?!?
i absolutely adored the colors, patterns and bold designs of the prismatic core kit.  the bright colors of pink and turquoise just helped to pop my page in the most amazing way.  if you have not yet seen this kit, i definitely recommend it.  it is amazing.


to build my page, i always begin with adding in photos and cards and then using my fuse tool to simply secure in place.  beginning at the bottom right hand corner and moving upwards i love adding in different pieces and layers to make my spread come alive.


this gorgeous 'you mean the world to me' card is the first card i placed in my page.  i love the banner title and thought it would look cute with a photo placed over top.  so i added a photo on top with a 4x6 pocket sleeve and fused it directly onto my page protector to create a flap.  


i added the gorgeous wood veneer 'noted' directly on top of the page protector simply using glue dots to attach.  i love that it adds texture and dimension on top of the page protector by keeping it outside of the pockets.


i loved including instax prints onto my pocket page.  again, i chose to simply adhere my instax print outside of the page protector here and use a fun flagged paper clip to keep my photo in place.  i added a couple extra of the beautiful pink heidi swapp puffy stickers to my instax as well...because they are just so cute!


i added even more interactivity to my page as well by creating this cute 3x4 pocket photo sleeve waterfall.  i love that i could include more of my favourite products onto my page without compromising my photos and not having enough space for them.  in this waterfall i was able to include some favourite embellishments, cards and journaling!


this gorgeous 'hello' foiled card from the prismatic core kit is amazing "as is", but i added in this adorable 'fun' plastic acrylic shape from the project life fill in the blank value kit.  they are super thick plastic with gold foil detailing and are awesome!


i also loved including these fun acrylic pieces into my spread also.  they come in the fill in the blank value kit also and make such fun embellishments.  to attach i simply used glue dots again here.


again, here i included another instax photo.  however this time i placed it inside the page protector and added a gorgeous foil word jumbles gold sticker to the bottom of my instax.  i love that instax photos have that space to add in something extra.  whether it's journaling, stickers or a bit of both it is such a fun space to play and get creative with.


i love the many layers and memories i was able to capture with this page.


i hope that i have inspired you with this page to print some of your beautiful fall photos out (i know you have them), grab a heidi swapp core kit, some fabulous embellishments from michaels....maybe an instax printer??? ;) and get to making pretty stuff!

Supplies: Project Life Core Kit Prismatic Edition; Project Life Fill in the Blank Value Kit; Paper Clips Flag Pink; Word Jumbles Pink Gold; Word Jumbles Mint Gold; Glitter Puffy Alphabet Stickers Gold; Dipped Tags Blues; Wood Words Today; Becky Higgins Project Life Fuse Tool; 12x12 Becky Higgins Project Life Page Protector; Project Life Photo Sleeve 3x4; Project Life Photo Sleeve 4x6


0
Back to Top